How many of you are working on informational/how-to writing right now? Our kindergarten classes are in full swing. The students love informational writing. We have been reading non-fiction books and writing the information we learn from them.
As we worked on "how-to" writing, we wanted to write about "How to Build a Snowman," but we don't get snow in south Georgia, so we had to be creative. I found a great video about "How to Build a Snowman" so the students could at least see how it is done. The video is short and simple. You can find the video HERE!
After the video, I asked the students, "Who wants to build a snowman?" Of course they all raised their hand and looked at me sort of puzzled. I asked them if we had any snow and of course they said, "No." I told them that we had to be creative, and then I started pulling some supplies out of my bag (marshmallows, icing, pretzel sticks, mini chocolate chip morsels, and miniature Reese's cups). They knew from the marshmallows what we were going to do.
We discussed which supplies we would use for what parts of the snowman, and I modeled the procedure. Then, off to work they went. You can see from the photos below that they had a blast!
We used icing to hold the "snowballs" together.
We used pretzel sticks for the arms.
Mini chocolate morsels worked great for the face and buttons.
It was starting to get a little messy since it was so hard for some of them not to lick their fingers during the process.
Last, they added a miniature Reese's cup for the hat!
I thought they turned out very cute! They had a blast making these snowmen!
Of course we had to tie in some learning during this fun process, so we wrote our steps for "How to Build a Snowman" using the words first, next, and last. You can see their writing samples below. We acted like we had the real items for the snowman in our writing.
First, we roll three balls of snow on top of each other. Next, we give the snowman two arms and eyes. Last, we give the snowman a hat and tie.
First, you make three snowballs and put three snowballs on each other. Next, you put the eyes and the mouth and buttons. (You can see that this student is still confusing "in" with "and.")
First, you roll three balls of snow! Next, you can make a face. Last, you add a scarf. Then you add a hat. The hat is pink!
First, you pack snow. Then you roll them. Next, you add coal to make the eyes and carrot for the nose and add twigs. Last, you add a hat. Then you put a pipe. Then you put a bowtie.
These students definitely had some different ideas about decorating their snowmen. I thought they did an awesome job!
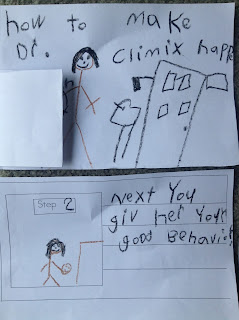
Last, I just have to share this adorable "How to" writing from one of my students below. After we completed several "How to" writings together with the same topics such as the one above, students were allowed to choose their own topics for their "How to" books. This one below made my day. I rolled with laughter when I read it, and, of course, the student did too. She couldn't wait for me to read it. I was going to take them up and finish conferencing with them the next day, but she begged me to read hers, so I had to. I definitely had to share it with my husband!
Remember that the students chose their own topics.
How to Make Dr. Clements Happy (title page)
First, you give her flowers. Then give her a hug. Next, you give her your good behavior (notice the smiley face I am holding that I give to students who I catch being good). Last, you find her a man to date.
I thought this was hilarious, and I love her illustrations.
If you like the "How to" writings and you need more ideas, you can find them below! The snowman writing template from above is in the "January Writing Center" packet below. There is a different "How to Build a Snowman" template in the Winter Print and Learn pack below.
I hope your students have fun with their "How-to" writings!


This comment has been removed by a blog administrator.
ReplyDelete